How to define a standard in EMu
Exporting EMu data compliant with a particular standard is performed using EMu’s Scheduled Exports facility.
- In order to use the Scheduled Exports facility, a user must have (or be a member of a group that has) the
daExportpermission. - See Information for System Administrators for details about Cron setup and the
emuexportcommand, a program used to execute scheduled exports. - Rather than using Cron to export data, it is possible to specify the time at which a scheduled export will run by configuring a Scheduled Operation. Details here.
- Details about how to develop an After Export script can be found here.
- Three Registry entries are provided for working with Standards:
Extension Repeater Registry entry
Output a row for each value in a table of values when exporting extension data.
- Define a record to be used to preview the output of Standards module Term Definitions.
- Specify two standards that can be exported together.
A standard is defined in EMu through the creation and maintenance of two types of record in the Standards module:

|
Record Type |
Details |
|---|---|
|
Term Definition |
A Term Definition record associates one or more EMu fields with a term in a standard. Multiple Term Definition records are created for each standard. |
|
Standard |
A Standard record groups Term Definitions into a single export format compliant with a particular standard. |
Using the EMu Scheduled Exports facility, it is then possible to export EMu data compliant with that standard. While a typical export from EMu allows data to be exported from one or more columns, data is exported as is; it cannot be manipulated, formatted or combined with other values as it is exported. When exporting to a standard it is possible to combine, manipulate and format values from two or more columns to produce a single export value.
The first step when implementing a standard in EMu is to create a series of Term Definition records:
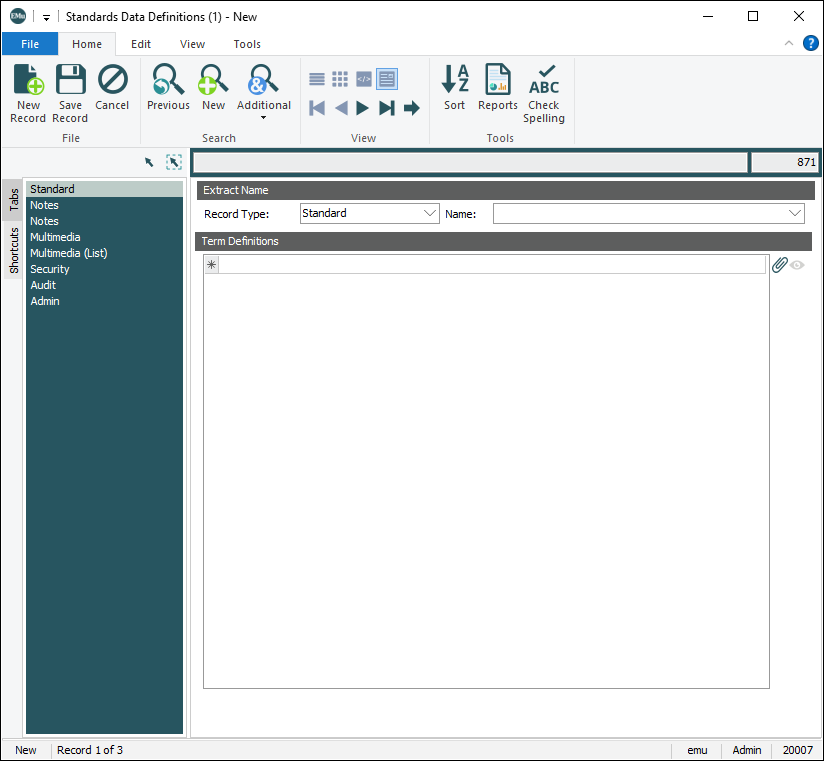
- Create a new record in the Standards module.
- Select Term Definition from the Record Type drop list:
-
On the Definition tab we name the standard and a term from that standard, associate the term with one or more EMu fields and define how the EMu data is formatted when it is output.
We describe how to complete each group of fields.
Note: If a Preview Registry entry has been defined for this standard, the Preview button will be enabled and a definition can be previewed and tested as it is created to ensure the output matches what is expected.
 Standard Name
Field
Details
Name
The name of the standard to which the Term Definition applies, e.g.
Darwin Core.The combination of Name: (Standard Name) and Term: (Definition) (which names the term in the standard) must be unique.
Version
The version of the standard with which the Term Definition is compliant.
Module
The name of the EMu module holding the data (in one or more fields) that will be output for this term.
We name the term in Term: (Definition).
We name each EMu field that will be output for this term in Field: (Definition Details).
Note: A term can be associated with more than one EMu field in this module by selecting the empty row in the Definitions table. When the EMu data from more than one field is output it is concatenated and formatted according to the rules we will specify in this record.
The first time a standard name is used, it is associated with the EMu module recorded in Module: (Standard Name) and any subsequent Term Definitions made for the same standard are automatically tied to that module.
Note: When we define a Standard record that groups Term Definitions for a standard, Dublin Core for instance, all of the Term Definition records must use the same module (e.g. ecatalogue). If it is necessary to include records from other modules in the output of data, define another Standard record, Audubon Core for instance (grouping relevant Term Definitions from another module) and use the Extension process to combine the two (or more) standards when defining the export.
Status
The status of this Term Definition:
- Active
- New
- Pending
- Retired
 Definition
Field
Details
Term
The name of the term found in the standard named in Name: (Standard Name).
To eliminate ambiguity where standards use the same term the convention is to prefix the name of the term with an abbreviation of the standard's name (e.g.
dwc:for Darwin Core,dc:for Dublin Core).For example:
-
The Darwin Core term
localityisdwc:locality. -
The Dublin Core term
modifiedisdc:modified.
The combination of Name: (Standard Name) and Term: (Definition) must be unique. For example, if Name: (Standard Name) =
Dublin Core, there must be only one Term: (Definition) =dc:modifiedTerm URI/IRI
A reference link to the formal definition for the term if available.
The formatting method used to output the export data (these are mutually exclusive):
- String
The formatting information specified in Term Format String will be used.
- Script
The formatting specified in a perl subroutine on the Script tab will be used.
The String method is simple and fairly straightforward to define; Script, on the other hand, allows for more complex formatting of the output data but involves writing a perl subroutine.
If this field is left blank, the formatting method default to String.
 Nested Modifiers
These fields are relevant when the EMu field named in Field: (Definition Details) is a table:
Field
Details
Collapse Empty Values?
Yes or No.
One or more rows in a table can be empty. To exclude empty rows from the exported data, select Yes.
Remove Duplicate Values?
Yes or No.
Two or more rows in a table can hold the same value. To exclude a duplicated value from the exported data, Select Yes.
Nested Separator
Specify the symbol to use to separate values when data is exported from each row in the table.
If this field is empty, the pipe symbol
|is used by default. Term Format String
When creating a Term Definition record, two mutually exclusive methods for formatting the output data are available, String and Script. The String method is simple and fairly straightforward to define; Script, on the other hand, allows for more complex formatting of the output data but involves writing a perl subroutine.
Term Format String is enabled when String is selected in Format Specifier: (Definition) (or by default if no selection is made in Format Specifier: (Definition)). It is disabled if Script is selected in Format Specifier: (Definition).
Field
Details
Term Format String
A simple formatting string that determines the format of the data exported from the EMu field or fields named in Field: (Definition Details).
As noted above, by selecting the empty row in the Definitions table a term can be associated with more than one EMu field in the module named in Module: (Standard Name). When the EMu data is output it is concatenated and formatted according to the rules we specify here (or on the Script tab).
Format specifiers are those offered by Perl’s
sprintfformat, e.g.:%%a percent sign
%ca character with the given number
%sa string
%da signed integer, in decimal
%uan unsigned integer, in decimal
%oan unsigned integer, in octal
%xan unsigned integer, in hexadecimal
%ea floating-point number, in scientific notation
%fa floating-point number, in fixed decimal notation
%ga floating-point number, in
%eor%fnotationTip: All formatting options described here.
Each EMu field that will be output for this term must have its own specifier in the Term Format String.
 For example
A term is associated with two EMu fields, AdmDateInserted and AdmTimeInserted, and each field must be accounted for in the Term Format String, e.g.:
%s %sWhen the EMu data is output for the current term, the date (AdmDateInserted) will be followed by a space and then the time (AdmTimeInserted).
The format of the date and time is defined by selection of an option from the Format: (Definition Details) drop list (details below). Assuming the selection was ISO, the data would be output as:
2022-11-22 14:19:22.000Note: If this field is left blank and the Format Specifier is not Script, the default Term Format String is string (
%s). Definition Details
Field
Details
Field
The EMu field in the module named in Module: (Standard Name) from which the data will be output.
Note: By selecting the empty row in the Definitions table a term can be associated with more than one EMu field in the module. When the EMu data is output it is concatenated.
Click the Add Fields
 button to list available fields:
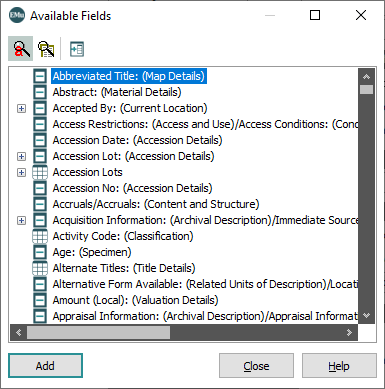
Double-click a field or select a field and click Add to add its system name to Field: (Definition Details).
Note that a row is added to the Definitions table holding the system name for the selected field:
Row Inclusion
Where the field selected in Field: (Definition Details) is a table, specify which row(s) to export. Options include:
- All Rows
- First Row
- Last Row
A drop list of format options; the available options depend on the data type of the field selected in Field: (Definition Details).
Field formatting selected here is applied before term String or Script formatting.
 Field format options
Field formatting options are:
Data Type
Format option
Details
Text
Uppercase
Convert all text characters to upper case, e.g. UPPERCASE.
Lowercase
Convert all text characters to lower case, e.g. lowercase.
Title case
Convert the first character of each word to upper case and the remaining characters to lower case, e.g. Title Case.
Date
If no format is selected in the Format drop list, dates are output in ISO-8601 format by default.
Depending on the format selected, dates may be output with or without spaces by default. Where there is no default separator, a symbol (or space) can be specified in the Format Separator: (Definition Details) field to separate the individual components of a date (except where noted).
Some date formats include spaces by default; a symbol could be specified in the Format Separator: (Definition Details) field to replace the space although the result is inferior.
ISO-8601
ISO standard date format: YYYY-MM-DD
e.g.
2022-12-22Note: ISO-8601 is always output in this format using hyphens; any separator specified in Format Separator: (Definition Details) is ignored.
DMY
Date formatted as day month year (with no spaces between components): DDMMYYY
e.g.
18122022With
/separator:18/12/2022DMonY
Date formatted in day month (abbreviated) year (with spaces between components): DD Mmm YYYY
e.g. 18 Dec 2022
DMonthY
Date formatted in day month (full) year (with spaces between components): DD MMM YYYY
e.g. 18 December 2022
MDY
Date formatted in month day year (with no spaces between components): MMDDYYYY
e.g.
12182022With
/separator:12/18/2022MonDY
Date formatted in month (abbreviated) day, year (with spaces between components): Mmm DD, YYYY
e.g. Dec 18, 2022
MonthDY
Date formatted in month (full) day, year (with spaces between components): MMM DD, YYYY
e.g. December 18, 2022
YMD
Date formatted in year month day (with no spaces between components): YYYYMMDD
e.g.
20221218With
/separator:2022/12/18YMonD
Date formatted in year month (abbreviated) day (with spaces between components): YYYY Mmm DD
e.g. 2022 Dec 18
YMonthD
Date formatted in year month (full) day (with spaces between components): YYYY MMM DD
e.g. 2022 December 18
Time
If no format is selected in the Format drop list, times are output in ISO-8601 format by default.
Note: In some cases a format separator can be specified in Format Separator: (Definition Details) although the default format is usually the most appropriate.
ISO-8601
ISO standard time format: hh:mm:ss.sss
e.g.
09:59:44.000Note: ISO-8601 is always output in this format; any separator specified in Format Separator: (Definition Details) is ignored.
24hr
Time formatted in 24 hour clock format in hours and minutes (with no separator): hhmm
e.g.
1359Note: Any separator specified in Format Separator: (Definition Details) is ignored.
HMS
Time formatted for 24 hour clock in hours:minutes:seconds: hh:mm:ss
e.g.
13:59:20DHMS
Time formatted for 12 hour clock (duodecimal) in hours:minutes:seconds: hh:mm:ssAM/PM
e.g.
12:43:44AMLatitude
DMSA
Latitude formatted in degrees, minutes, seconds, e.g.:
30°12’33.22”
CDMSA
Latitude formatted in compass degrees, minutes, seconds, e.g.:
30°12’33.22”N
DDA
Latitude formatted in decimal degrees, e.g.:
30.125
CDDA
Latitude formatted in compass decimal degrees, e.g.:
30.125N
Longitude
DMSO
Longitude formatted in degrees, minutes and seconds), e.g.:
-50°09’25.26”
CDMSO
Longitude formatted in compass degrees, minutes and seconds, e.g.:
50°09’25.26”W
DDO
Longitude formatted in decimal degrees, e.g.:
-50.093
CDDO
Longitude formatted in compass decimal degrees, e.g.:
50.093W
Where the data being exported comprises two or more components (e.g. dates, times, etc.) it is possible to specify the character(s) that separate each part. A separator can be one or more characters (
/or-for instance) or a space (by keying a space in the field).Note:
-
For some formats (e.g. ISO-8601), a default separator is always used and a separator specified here is ignored.
-
Some date formats include spaces by default; a symbol could be specified in the Format Separator: (Definition Details) field to replace the space although the result is inferior.
It is possible to use the value of a previously defined term as part of the current Term Definition.
Select the Add Term
 button to display a list of existing Term Definitions for the standard selected in Name: (Standard Name):
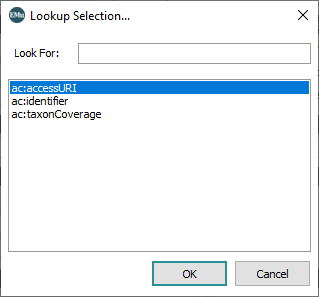
Double-click a Term Definition or select a Term Definition and click OK to add it to the Defined Term: (Definition Details) field.
Note: Field and Defined Term are mutually exclusive.
One or more conditions can be defined to determine whether the data in Field: (Definition Details) is output: the data is output where the conditions are met.
Tip: Each EMu field listed in the Definitions table can have its own where conditions assigned.
For each EMu field, conditions are defined in the Where Details fields. When a condition is defined it is added to the Where Conditions table.
The options in the Type Of Where drop list determine how the conditions are processed:
-
Used when there is one or more condition listed in the Where Conditions table.
EMu will evaluate the condition(s) to return a value that is either TRUE or FALSE. If a value of TRUE is returned, the data from the field named in Field: (Definition Details) is output.
 Example
Consider the highlighted details in this Catalogue record:
Here we see use of Boolean in conjunction with the Operator (AND / OR) drop list.
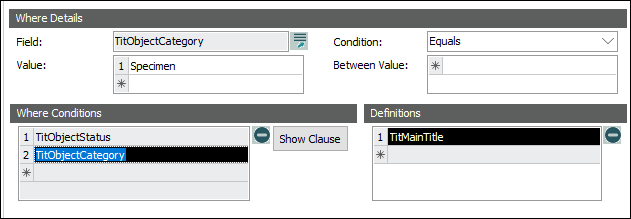
Two conditions have been defined to determine whether the Main Title (TitMainTitle) will be output:
Given the Catalogue record above, the Main Title will not be output as only one condition is met (as TitObjectCategory = Work of Art not Specimen).
If we change the Operator to OR:

the Main Title will be output as one of the conditions is met.
-
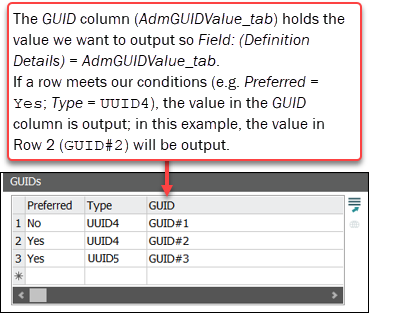
Used when testing values in a table against one or more conditions with the objective of outputting a value from the table (Field: (Definition Details) is set to a field / column in the table). Each row is tested against the condition(s) and if a row meets the condition(s), the value in Field: (Definition Details) is output. For example:
 Example
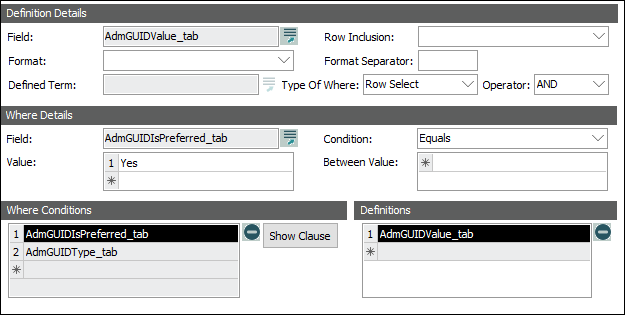
Our objective is to output the value in the GUID field (AdmGUIDValue_tab) if our conditions are met, so we set Field: (Definition Details) = AdmGUIDValue_tab.
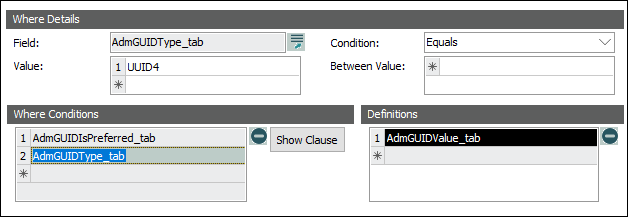
Two conditions are set:
EMu looks for the AdmGUIDValue_tab field in a table and tests each row against the two conditions that have been set. Only row two in our example above matches both conditions and the value in AdmGUIDValue_tab,
GUID#2, is output. -
As we have seen:
- A term can be associated with more than one EMu field in a module by selecting the empty row in the Definitions table. When the EMu data is output it is concatenated.
- Each EMu field listed in the Definitions table can have its own set of where conditions.
The Group Row Select option can be used when each EMu field listed in the Definitions table is a column in a table AND the same conditions apply to each field.
Select Group Row Select and specify the conditions for the first field listed in the Definitions table only; EMu tests the conditions against the first field and if a row matches, values from the matching row in all of the fields listed in the Definitions table are output.
When multiple conditions are defined, select a Boolean operator to apply to the conditions:
- AND
The Boolean AND operator applies and a value is output only if all conditions are met (output a value when condition1 AND condition2 AND condition3... are met).
- OR
The Boolean OR operator applies and a value is output if at least one condition is met (output a value when condition1 OR condition2 OR condition3... is met).
 Where Details
One or more conditions can be defined to determine whether the data in Field: (Definition Details) is output (the data is output where the conditions are met).
Conditions are specified in the Where Details fields. When a condition is specified it is added to the Where Conditions table.
Field
Details
Field
The EMu field to be tested against a where condition.
Click the Lookup
 button to display the Available Fields box:
Double-click a field or select it and click Add to add it to Field: (Where Details).
Condition
The condition to be used to compare data in the field selected in Field: (Where Details) with a value specified in Value: (Where Details).
The list of options depends on the type of field selected in Field: (Where Details) (fields of type Date and Time include BETWEEN; Text fields do not):

Value
The value to compare against the data in the field selected in Field: (Where Details).
If multiple values are to be compared, add each one on a separate row.
If the option selected in Condition: (Where Details) = BETWEEN, enter the lower range here.
Between Value
If the option selected in Condition: (Where Details) = BETWEEN, enter the upper range here.
 Example
Consider the highlighted details in this Catalogue record:
In this example, the Main Title (TitMainTitle) will be output under two conditions:
-
Object Status is Accessioned:
TitObjectStatus equals accessioned
-
Object Category is Specimen:
TitObjectCategory equals Specimen
Given the Catalogue record above, the Main Title will not be output as only one condition is met (as TitObjectCategory = Work of Art not Specimen).
If we change the Operator to OR:

the Main Title will be output as one of the conditions is met.
 Where Conditions
Field
Details
Where Conditions
One or more conditions can be defined to determine whether the data in Field: (Definition Details) is output (the data is output where the conditions are met).
Conditions are specified in the Where Details fields. When a condition is specified it is added to the Where Conditions table. Select a row (row 2 in this example) to display its definition in the Where Details fields:
Click the Show Clause button to display the query clause that is generated for the Where Details values:

 Definitions
Field
Details
Definitions
A term can be associated with more than one EMu field in the module named in Module: (Standard Name). When a field is selected in Field: (Definition Details) it is added to the Definitions table. When the EMu data is output it is concatenated.
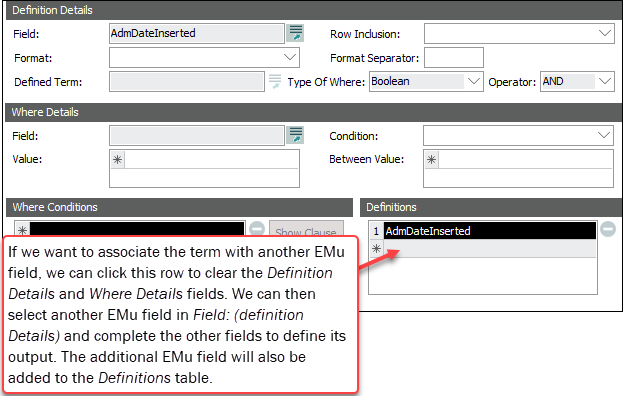
Selecting the empty row in the Definitions table clears the Definition Details and Where Details fields, allowing for the selection of another EMu field in Field: (Definition Details):
Select a row to display its details in the Definition Details and Where Details fields.
- The Script tab is used to define a perl subroutine (
fieldFormat) for formatting the output data.It is used when Format Specifier: (Definition) = Script and it allows for more complex formatting of the output data than is possible using Term Format String but does involve writing a perl subroutine.
 Details
The Script tab includes two fields:
Field
Details
Script
The Script field is only enabled when Format Specifier: (Definition) on the Definition tab = Script.
Here we enter a perl subroutine to format the output data.
If a Preview Registry entry has been defined for this standard, the Preview button will be enabled. Click the button to preview how data will be output.
 Details
When Format Specifier: (Definition) = Script, an empty Perl subroutine called
fieldFormatis added to the Script field:
Modify the subroutine to produce output in any desired format.
The desired value from the subroutine is passed back to the export using the
returnstatement. In the above code snippet,return “”;returns an empty string.Strict
The code for the subroutine must comply with perl’s
strictmodule and all variables used must be strictly defined. As such, each variable definition should be preceded with the reserved wordmy.Container
The code for the subroutine runs within a container in order that the execution of the code only allows formatting and does not allow access to any perl functions that interact with the machine (operating system calls or file functions, for example).
Array
The list of data from the Defined Terms is made available to the subroutine through the array
@fields. The order of the array is determined by the order of the EMu fields in the Definitions table. The array elements can be individually accessed by their index. Indexes range from zero to the number of definitions minus one.For example, if there are two Term Definitions:
- CatMuseum
- CatDepartment
the value for CatMuseum is accessible through
$fields[0]and CatDepartment through$fields[1].The Term Definitions may be Atomic (standard field), Nested (
_tab) or Double Nested (_nesttab). In each case values are passed through in the individual array elements. Below, we look at how to access the data for each of CatDepartment, CatDepartment_tab and CatDepatment_nesttab:CatDepartment
my $department = $fields[0];
For any nested tables, the data will be returned as a string with each row separated by the Nested Separator (
|by default):CatDepartment_tab or CatDepartment_nesttab
my @departments = split(/\|/, $fields[0]);
my $department1 = $department[0];
my $department2 = $department[1];
For reverse references the data will be returned as a string with each record separated by the Control A (
^A) character. This is specified aschr(1)in perl.CatDepartment
my $marker = chr(1);
my @departments = split(/$marker/, $fields[0]);
my $department1 = $department[0];
my $department2 = $department[1];
CatDepartment_tab or CatDepartment_nesttab
my $marker = chr(1);
my @departnest = split(/$marker/, $fields[0]);
foreach my $deparray (@departnest)
{my @department = split(/\|/, $deparray);
my $department1 = $department[0];
my $department2 = $department[1];
}
The perl subroutine must always return a value:
sub
fieldFormat
{my $department = $fields[0];
if ($department =~ /Mammalogy/i)
{return(“Mammals”);
}
return($department);
}
In the above example the department is passed to the subroutine and checked to see if it is
Mammalogy. If it is,Mammalsis returned otherwise the department (unchanged) is returned. Each path through the subroutine has a return statement.Errors
A read-only list of errors identified in the perl routine. All errors must be resolved before the term can be generated.
A Standard record groups individual Term Definitions into a single export format compliant with a particular standard:
- Create a new record in the Standards module.
- Select Standard from the Record Type drop list:
- On the Standard tab we name the standard and link to the Term Definition records required to output your EMu data to that standard:
Field group
Field
Details
Extract Name
Name
A unique name for the standard. This can be that of a real standard (e.g. Darwin Core) or any other descriptive name as long as it is unique.
This name will be selected when defining an export using the Tools>Export option in the Ribbon of the module that the standard is associated with (see How to create a Scheduled Export for details).
Term Definitions
Link to the Term Definition records required to output the named standard.
All Term Definition records must use the same module (e.g. ecatalogue).
Note: When we define a Standard record that groups Term Definitions for a standard, Dublin Core for instance, all of the Term Definition records must use the same module (e.g. ecatalogue). If it is necessary to include records from other modules in the output of data, define another Standard record, Audubon Core for instance (grouping relevant Term Definitions from another module) and use the Extension process to combine the two (or more) standards when defining the export.
Click Attach
 beside the Term Definitions field to open another instance of the Standards module and search for the Term Definition record(s) required for the named standard. Details about attaching records can be found here.
To view all of the Term Definition records associated with a standard click the  icon beside the Term Definitions field.
When individual Term Definition records have been grouped together in a single Standard record compliant with a particular standard, your data is ready to be exported. See How to create a Scheduled Export for details.


